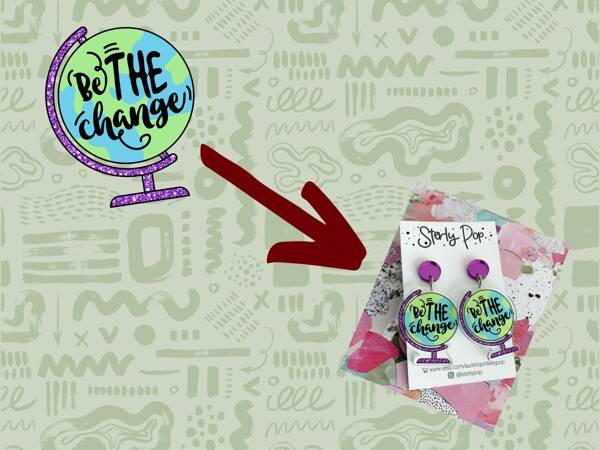
So, you want us to print your earrings for you, but you're not sure on what you need to send us to allow us to work our magic? This blog post is intended to cover off what we need, and as a bonus, shows how we take your artwork from what you supply to something that's ready to print!
We can work from most things that you supply us, but sometimes the quality of the output will vary depending on what you send. We're super pedantic about getting the best possible result for you, so we'll work with you and your artwork to come up with the absolute best result for a perfect print.
We use Adobe Illustrator and Adobe Photoshop which are industry-standard and can read most artwork that we're likely to encounter.
Here is what we can work with, based on what customers supply us. These are all covered by our standard setup fees for earrings:
There are a few things that we can't easily work with:
In the following sections, we break down how we prepare these.
This is the most common artwork that we get. To prepare it for a machine, we need to get the image, and a vector path for the outside shape. Here is an example from Dearest Sally Snowdrop's dog range:
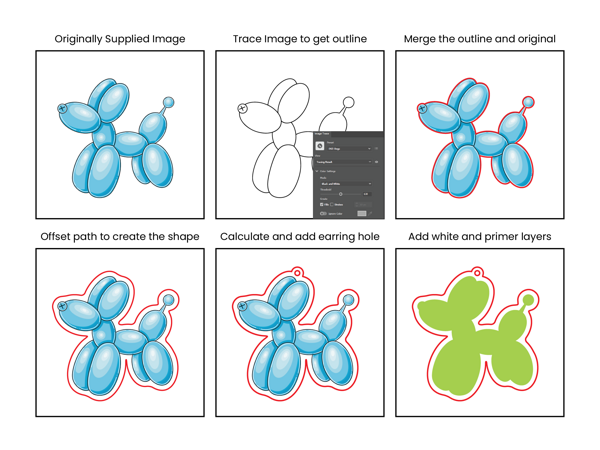
Obviously, each image is different and does require some adjustments to get it to work. In this example, the illustrations have a nice sharp black border that we can use to easily get the outline. Other images do not have this border and we need to tune the threshold to get a suitable border. Also, if you use Adobe Illustrator to trace the image on top of the original image, the traced vectors are ever-so-slightly offset from the original image, so we need to manually move it into the correct position over the image.
We do need to get a good vector outline for your image as it's used for two purposes. The first purpose is to create the border around the earring, which is normally 1.5mm away from the artwork. The second use is to prepare the white and primer layers for the printer. In this case, we tell the printer exactly where to print white ink and primer ink if it's used for this job. This is really important when we print on clear acrylic - our most common printing colour - as without the white, you won't see the colours. The printer can automatically determine where to print white ink... except when the image contains white, in which case it can't - so for the most consistent results we spend some significant time getting the right white layer and be very specific with the printer!
The final note is about where we place the earring hole! In this example, it's not the center of the image - its actually offset to the left. We calculate the centroid of the earring and place the hole there, so that the earring hangs straight as shown. If we just put it in the middle, often the earring would hang at an odd angle!
This is less common, and often happens if you purchase images from a website for us to print. It's the best result if you can though! These work very much the same as the illustration as a raster image, except to get the outline we normally can ask Illustrator to merge the shapes together into a single outline. I say normally because sometimes this doesn't work correctly if the image contains meshes or strange gradients, and often causes some unsavoury language from me when it happens...
After we get the outline, the process is the same as if it's a raster image like the method shown above.
We do a few of these ones! These work best when we take an area out of the image to print as a pattern on a circle or similar. The example below uses a painting on canvas by Dijuway Designs called "My Place".
To get these to us, you can take a photo of your artwork. Here's what to keep in mind when you take the photo:
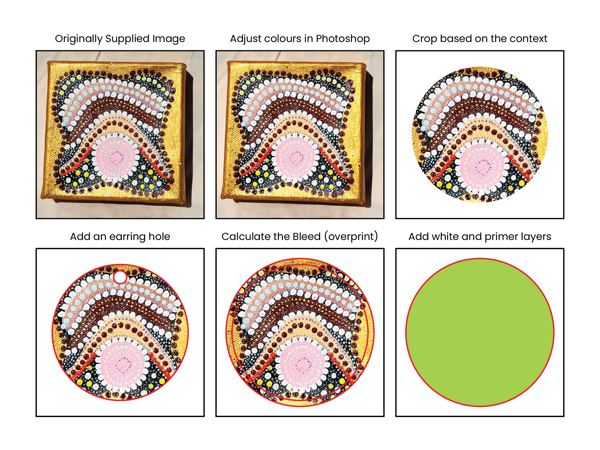
Normally, we print these pattern ones right to the edge - and in fact, over the edge - known as a bleed. For the best results, it's printed and then trimmed with the laser afterwards, in what we call a Cut Print Cut.
But we can also isolate sections of the artwork too and do them as normal shaped earrings as well! This is a bit more involved as it takes time to isolate the shape from the image. An example we did recently is a turtle and echidna - these were isolated from a painting and cut to shape. I can't share the examples of these ones, but I wanted to note that it's possible!
So now you know roughly how we prepare the initial artwork for our earrings - you're now excited to get your own designs on earrings! So head on over to our Wholesale UV printed earrings page and place your order, or contact us to talk through your requirements and artwork and we'll go from there!
So there was a few terms in the above text that might be new to you. So let's get much more technical on what these mean!
Our first recommendation for the absolute best quality is to supply us the artwork in a vector format instead of a raster format where possible - but raster images are just fine for many applications. But what does this rather technical term mean, why is vector better, and why is raster perfectly fine for many uses too?
When computers work with images, they need to do the same thing they do with absolutely everything they process - reduce the image into numbers that it can work with. Without delving into the fascinating and huge field of computer science, let's limit ourselves to just talking about image data today!
Raster images are easiest thought about as a photograph. To represent a photo, a computer has a two-dimensional grid of pixels, and each of those grid locations has a colour number. Once the computer has this, it can do all kinds of cool things with the data.
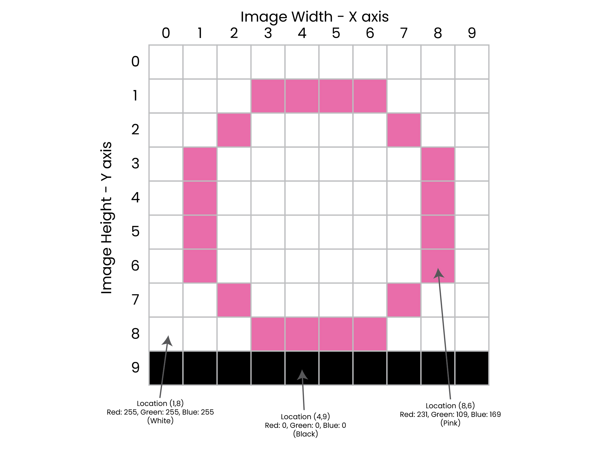
Raster images have a resolution - that is the number of pixels that they have - the width and height you see in the diagram. Computers can easily reduce the size and resolution of an image, by a process of removing pixels and calculating what they should be. But it can't increase the size or resolution of the image without making the image blurry - the computer can't add pixels and then easily work out what those pixels should be. (This is changing with new AI technology, but at some level, the computer is literally guessing what to add!).
When it comes to printing, traditionally, it's been accepted that 300dpi is a good printing resolution - at most distances when you look at it, it looks like a solid image. There was a new term - let's break that down! DPI is dots per inch, a non-metric measurement. Basically, if you're printing an image at 300dpi, you'll fit 300 pixels into every inch that you print - or let's be more modern and say 11.8 pixels for every millimeter (although we all just use DPI as this is widely understood!). Or let's go deeper and say it's roughly two human hair thicknesses for each pixel. More dots per pixel is better - our UV printers normally operate at 720dpi, but they can operate at 1440dpi too.
So when we print, the source image should work out to be 300dpi or higher - the computer can easily scale it down but can't scale it up well. Let's put this in numbers to make it make sense. Let's say your earring is 40mm in diameter. To print at 300dpi, the image needs to be at least 472 pixels wide and 472 pixels tall. If you want to print a 50mm diameter earring, then it should be at least 590 pixels wide and 590 pixels tall.
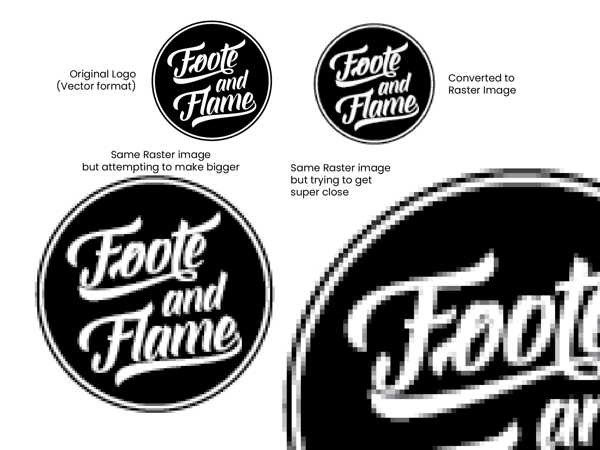
Your average phone camera will capture a photo with at least 1500 pixels wide although many will be much, much higher, to give you a good comparison.
Vector images are a different way to represent images. They're much more time consuming to create and have some other limitations. The image below shows how computers represent two basic shapes as a vector. They're a list of instructions to the computer on what to draw and where to draw it. For the rectangle, you can follow the instructions in order to generate the rectangle. For the circle, it's just one instruction. It gets way more complicated than this simple description especially when you add Bezier and quadratic curves to the list of things it can do, but this example should explain how it works.
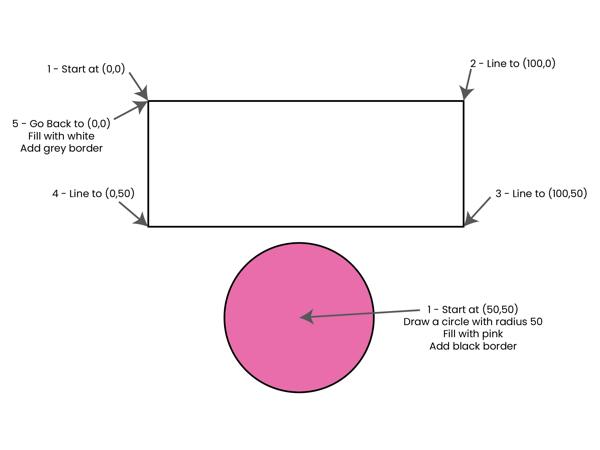
So what's better about a vector? Well, the computer can multiply all the numbers by 2, and suddenly the image is two times bigger without any loss of details - the computer isn't guessing what's in between - it knows and can work it out.
There is a second advantage as well. When we go to a laser cutter to cut out a shape, it can't cut a raster image directly. In short, when a laser cutter works, the computer tells it a list of locations to go to, to make your shape. In the rectangle example above, the computer tells the laser to move to (x=0mm, y=0mm), turn on the laser, move to (x=100mm, y=0mm), then move to (x=100mm, y=50mm), then move to (x=0, y=50mm), and finally move back to the start (x=0mm, y=0mm) and turn the laser off. Basically, we can move a vector illustrator straight to a laser, whereas we need to process a raster image into a vector before we can do anything on a laser with it.
Without going too deep into the computer science, computer screens represent colours in RGB by specifying how much red, green, and blue to use for each individual colour. Printers, however, work in CMYK, specifying how much cyan, magenta, yellow, and black to use for each individual colour. In most cases, what you send us goes straight to the printers, and we normally ask the printer to use a mode called "Max Impact" which improves the colours by changing them slightly and makes them much bolder - technically increasing the contrast slightly.
In some cases, you might want very specific colours to be reproduced for your earrings. We can ask the printer to print a specific CMYK value, but the actual result depends on what acrylic we print on, the white ink concentration at the time, whether we print on the back or front of clear acrylic. So if you need a specific colour, please get in touch, as we'll need to print custom samples and adjust them until they match your requirements - this is the only way to get the correct colour match. This isn't an issue for 99% of the earrings we produce - the default settings create stunning, high impact colours without further adjustments!
Earlier, if you were astutely reading, you would have noticed I said that we prefer PNG images over JPEG. I didn't say why at the time, which I immediately knew I wanted to fix. But to keep it simple, I've added this as an addenda.
To explain this easily, let's go back to the original concept of a raster image. Images take quite a bit of computer memory, and it goes up exponentially as the image gets bigger and bigger. Let's work with a concrete example. Let's say we have an image that's 500 pixels wide and 500 pixels tall. To make a grid that size, we actually have 500 x 500 = 250,000 pixels. Imagine trying to paint that many pixels by hand! The computer does it in a fraction of a second. Technically, each pixel needs three bytes of memory - one byte for red, one for green, and one for blue (mostly - I'm simplifying a touch!) - so the stored image is then 750,000 bytes.
But then let's go to your standard camera phone image. At the time of writing, the iPhone 14 Pro has a camera that takes photos at 8064 x 6048 pixels. Running the numbers up makes that 48,771,072 pixels. That's a lot of pixels to draw by hand! It's also a lot of pixels to store - you see your computer do this in the flash of an eye, but it does take time. And then comes the storage - at 3 bytes per pixel, we're suddenly storing 146,313,216 bytes. For those of us who are old enough, that's 101 x 3.5" floppy disks. Or for the newer ones, you can only store 4 of these on a music CD. Or newer again, 27 on a video DVD. This isn't practical, so...
To save storage space, and speed up operations because writing and reading from storage is slow, computers will compress images when storing them to disk. There are many, many ways to do this, but there are two common ways to do this - most other methods work similarly to these.
JPEG reduces the size of the image by removing some data. It's called lossy, as when you decompress the image, you won't get back exactly what you put in the first time. It's optimised for working with photos or similar images. I won't bore you with the full technical details, but in short, instead of storing the actual pixel data, it stores a few numbers that go into some complex algebraic functions that reproduce an approximation of the image when it's decompressed.
When storing a JPEG image, you can specify the quality - that is, how much data it will discard. This is a balance between saving storage space and having your image look good. Your camera will pick something suitable for most applications, but you can fine tune it.
The main issue with JPEG is that if you set the quality too low, you'll get artifacts when you decompress it. Also, it's much harder to scale it up as there is even less data to scale up than it started with.
For illustrations, PNG is preferred as the JPEG compression isn't optimised for illustrations - you'll end up with a lot of noise and errors when we use the image.
PNG works differently - it's called a lossless compression algorithm - which means when you decompress the image, you get back exactly what was compressed originally. But it doesn't compress photos very well. Illustrations which often have large areas of the same colour are perfect for PNG images and work great.
The simplest explanation of how PNG works is that it looks at the image and can say, "hey, this pixel is white, and the next 200 pixels across are also white. Then after that we've got a pink pixel, and the next 50 pixels are also pink." So instead of having to store those 200 white pixels, it can store one white pixel and an instruction on how many white pixels to do. But when you have a photo, where pretty much every pixel is different, PNG doesn't work well as it has to keep stopping to say "the next pixel is different".
So PNG for illustrations are ideal as they'll capture all those details without quality loss!
We've tried to make the above information as clear as we can, but computers are technical things! If you're not sure if what you have is suitable, or you've got any questions, please drop us an email and we'd be delighted to help!
"A big shoutout to Foote and Flame who saved the day with reprinting our Daughters 21st Cake Topper because she has silly parents who left the original one at home which is 4.5 hours away. Thank you so much this was our third order with you well technically four now, fantastic service and recommend this local company to everyone. 🌟🌟🌟🌟🌟"